Monday, September 23, 2013

Sorry & Back In The Room!

I'm so sorry I've not blogged recently- I am going to blame spending too much time crafting to type- plus I type and write all day as my day job so sometimes the thought of more creative writing after hours is just too much and I get my glue and inks out instead hahaha!

So I've been doing a few new crafty things- have done a nice fairy range of books and albums as kids seem to really love my work and I know how girls of all ages love fairies- in fact my nieces are begging me not to sell them and let them have them! (I'll make them some for Christmas!)

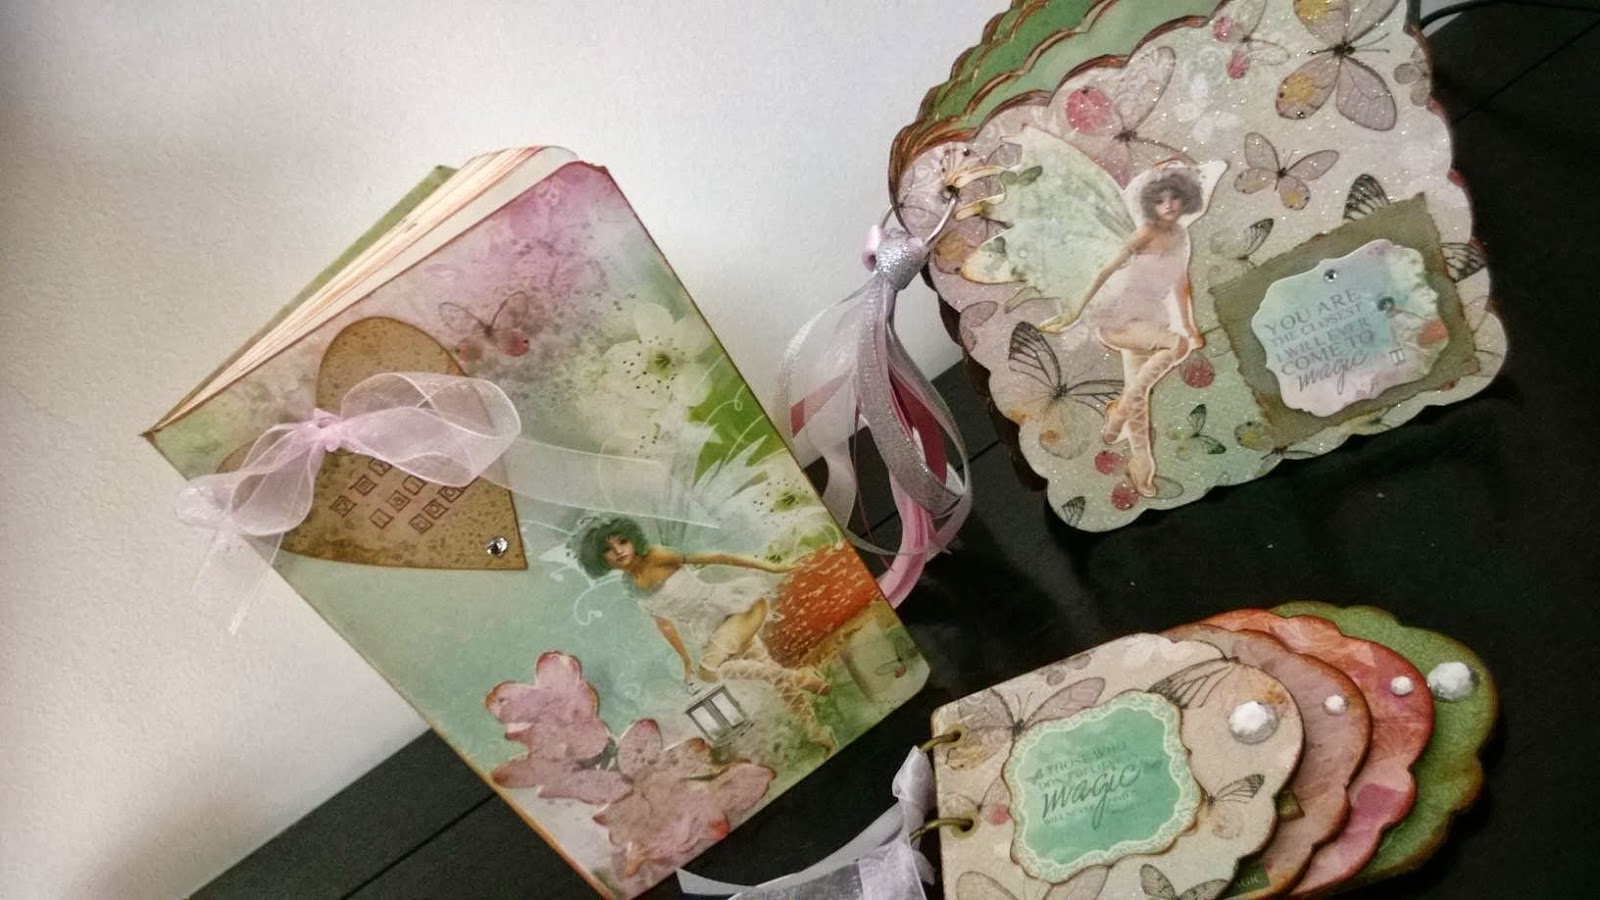
This is a blank notebook inside for writing and drawing your fairy sightings in!
I made a mini mini album, a mid size and a notebook for the fairy collection- lots of pink ribbon and sparkly gems too- I would have loved one as a young girl!

I've also done some vine wreaths and hearts this weekend- I always used to make wreaths for Christmas- so was nice to do something I've done before but with new skills and equipment! I wanted to keep my vintage style still and also make them a little bit rustic... I really enjoyed making these!

These are vine wreaths and hearts trimmed with ribbons and antiqued newsprint and music sheet butterflies!
This one has a floral wire frame that I wrapped with cardboard and trimmed with twine, ribbon and red wire and added hand made flowers and the beautiful butterflies with a smattering of love hearts thrown in!
I've also launched an online store on Little Majlis- it's a great website for artisans in the UAE and really easy to use... just need some sales now! Great to have an online presence and not totally be reliant on being at craft fairs!


You can visit my shop here www.littlemajlis.com/shop/scrappydoofripperies

 I'm also featured as a favourite crafter on ExpatWoman.com which is v exciting

www.expatwoman.com/dubai/monthly_shopping_deals_crafts_crafters.aspx

I've also been making some brooches... I think jewellery making might be too fiddly for me and I didn't know how the vintage-y feel would translate by using paper for jewellery- been quite surprised by the results and it's something I definitely want to do more of...

They look cute on- they are inked, stamped, painted, glossed and button attached! Took longer to make than you'd think!

So actually have been up to quite a lot... also got a new craft desk so am looking forward to spreading out- wish I could have a whole craft room- but I make do hahahah!

Hope you are all well and will be back soon!

Saturday, July 6, 2013

Decoupage Wooden Heart Tutorial

Don't worry I am still scrapbooking but its nice to branch out and try my hand at other things too and I'm loving napkin decoupage at the moment... The results are amazing and it's much quicker than doing an album so nice to have a little break!

I'd got a plain wooden heart from Cuddly Buddly and had been wondering what to do with it... So today it was decoupage time!

What you need...

Blank wooden heart
Stain or paint
Patterned napkin
Decoupage napkin glue
Brush- I use a rubber tip one
Soft cloth 
Ribbon

First of all I sanded the heart to make sure it was smooth and here's what it looked like blank


I used an oak coloured stain but you can use paint as well. Top tip don't use too dark a colour or the design won't show through! Dark brown is the darkest I've gone.

So I applied 2 coats of the stain with a soft cloth and the colour was lovely... A bit gingery!


I let it dry for about 20 minutes if you're using paint make sure it is really dry otherwise it will get mixed up with the glue and colour the napkin.

I then cut out the heart shape on my napkins adding about an extra half centimetre so I could fold it over the edges of the heart too. Top tip... Cut the shape out if you napkin before you remove the top layer as it's so much easier!

Now you can peel the top layer of the napkin off and your ready to start the magic!


Place the napkin on the shape... Get a big blob of the glue ready on the side and your brush... I use rubber tip ones as I find they really eliminate any air bubbles. Always start from the middle and work outwards. As you apply the glue it soaks through the napkin which sticks it to the wood and makes the napkin go transparent... That's great as you can see which bits you've done!


So do the whole shape, leave the edges to the end... I also use my finger to smooth everything down. Make sure your finger is wet with the glue so you don't stick to the napkin. The napkin is quite fragile when wet so do be careful ... If you do make a bodge you can always put another piece of napkin over it... I managed to do this one bodge free hahaha!

I let this one side dry fully before repeating the same on the other side. I hung it to dry for about half an our then I applied another layer of the glue to finish it off nicely. I tend to use my fingers a lot for decoupage projects! Messy but love pulling the layers of glue off my fingers afterwards :)

I then added a bow and hanging loop with some lovely brown ribbon and voila finito! Bambi didn't mind posing for the shot of the finished heart! Hope you like... These are my favourite napkins to use as they go almost completely see through... They have a cream background so look out for that if you want to replicate the look.

Monday, July 1, 2013

Cute Travel Journal

I've been honing my decoupage skills recently but have got a market coming up soon so need more photo albums too! Don't want to forget my skills!

I've been quite intricate with the insides of this travel journal... There's loads of little pockets, flaps and places to put memorabilia of your holiday and photos... It's going to make a fab gift for someone! I live to keep all the memories from my travels and this book will look great on display and keep the memories alive!

Hope you like the pics!


Used my new mini alphabet stamp from Hobbycraft to do the lettering on the tag


I love the travel paper clips... Had to do a bit of self assembly hahaha!


Put some painted pages in too... Getting into all of this mixed media!


Loads of places to put those memories!


The back cover kept quite simple!

Hope it goes to a nice home in the end... Would love to see what people do with them once they've whisked one of my babies away :)

Thursday, May 23, 2013

On Branching Out! Birdhouse Time!

I've been nervous about trying new things as I'm very good at being all the gear and no idea! Anyway I'd got hold of a blank birdhouse and been dying to vintage it up scrapbook stylee so had a go at it yesterday and am well happy with the results.

I used my Tim Holtz Alterations dies for the decorations and painted it, stamped it, distressed it and sealed it... And it's so cute! I had painted it gold and brown to start off with but changed my mind! The pics below show the stages and the finished item... Going to do some more for sure... Nice to have a bit of variety on my next stall. (Which is the Arte Souk in Times Square in July- plenty of time to get some new stock built up)

Hope you like my vintage birdy box....

How it looked before I got at it!


I didn't like the gold wasn't vintagey enough for me

That's better... All brown! Nice though cos the gold glimmers through a little bit... On purpose I did that of course hahaha!


The Tim Holtz die cut bits and bobs I'd made... Distressed and stamped and sealed. I covered the top birdy hole with the lock to make it look funky!


Stamped the roofs with a Tim Holtz stamp and sealed... Am praying it dries clear at this point!

And voila! Finished!


Finished cheep cheep :) I really enjoyed making this.. More to follow I predict!


Monday, May 20, 2013

Fabulous Fifties... From Marianne Design

I have been dying to make a new scrap book album but been lacking the urge... No orders at the mo and no market looming... so have taken the time to get organised, order some new fabby things and maybe try some different things as well. Until that stock arrives though I had a root through what I have and found the new Fabulous Fifties stack from Marianne Design that had arrived last week and yay I was inspired again!

I've been experimenting with paint colours for my covers as well so decided n a metallic copper... Have done the hand painting but not the embellishment yet... Tonight I focused on the pages. I also received my Movers and Shapers metallic tray by Tim Holtz to use with my Big Shot- so no more trying to make it fit the sandwich with bits of card... So much easier hahaha! Hence there's tons of lovely love hearts in these pages.

Here's a pic of the results and will post the covers when I've done them too so you can see the finished item... It's quite a big album for once 15cm by 22cm so lots of room for fab pics, notes and memories to put in my custom memory envelopes too.


Had fun with my new stash of buttons too as well as a mini scrapper panic... Nearly run out of Glossy Accents... Heaven forbid... I know where I'm going this weekend!

Tuesday, May 14, 2013

How it all began!

I'm a new to scrapping scrapper! I started in June last year and haven't looked back! It all started when I went to a craft fair in Oman and saw some cute little albums a lady had made. I bought one and as per usual thought "I could do that!" Which has been the start of many a crafty attempt by me... I've tried it all... Painting, sewing, crocheting, knitting, glass painting, paper mâché, making candle sticks from plaster of Paris... And failed at them all!

So I started making an album for my little brother who had just got married, then I did one for my mum with all her grandchildren in...  then before I knew it I'd made 20 albums! Just a few too many for presents and I wanted to make more...

I started to buy more equipment and supplies... Found the wonderful Tim Holtz and Graphic 45 and a fab website called Cuddly Buddly to order things from as well as the craft shops here in Dubai... Creative Hands and Paper Lane... And booked a stall at the ExpatWoman Winter Fair. I was going to sell my wares!

Guess what?

I sold out all my stock of 35 albums... I wasn't totally nuts... There was a market for my hobby so I could carry on with it. Finally I had found something I was actually good at! I don't know who was more shocked... My family, my husband or me! Hahahah!

So since then I've done 5 fairs including the RIPE Market and Arte Souk and some cute school fairs and have also been dong special orders for people too... I am now a "commissioned artist"... Well in my head I am!

I'm going to share my creative journey here with you as we'll as tips, ideas and inspiration and feedback n the various markets in Dubai and anything else that occurs to me!

Exciting times!